Azure Active Directory Synchronization: Filtering, Part 1
 Reading Time: 6 minutes
This post is the third in a series about Azure Active Directory Synchronization and will cover Filtering. Originally I've planned to make this one post, but in my opinion it became too large and complex thus again a part 2. Other posts have covered and will cover:
- Introduction, Part 1
- Introduction, Part 2
- Filtering, Part 2
- Object Matching
- Alternate Logon ID
Why would you want to filter?
In most cases the current Active Directory (AD) implementation contains a lot more objects (user accounts, contacts and groups) than are required within Azure Active Directory (Azure AD). For instance, service accounts that are only required on-premises may have no purpose to be synchronized for Office 365. Luckily, you can filter objects, so that only the ones you require online are synchronized. Filtering makes synchronization more secure (no forgotten accounts in the services, hence less attack Surface), in certain ways less complex and it can speed up synchronization.
Filtering can also help you to limit the amount of objects, which in turn can help you keep your AADSync database small enough preventing the need for a full SQL implementation (default install is using SQL Express LocalDB and has a ~50.000 objects limit, with SQL Express it's about 100.000). Additionally, you may not bump into the artificial synchronization ceilings incorporated by Microsoft (these require a support call to be lifted) and Azure Active Directory Free might suit your needs, since it's limited to 500.000 objects. (this requires licenses to be lifted)
What can you filter on?
There are three filtering fields that are supported:
You can use all, two or just one field to filter. Which field(s) you choose, is in part dependent on how your Active Directory is or Active Directories are structured and what objects need to be synchronized to Azure AD/Office 365.
Domain
So how do filter on domain?
- Start the Synchronization Service Manager (or miisclient in DirSync).
- Go to the Connectors tab and select the Connector for the AD you want to filter.
- Right click and select Properties.
- Go to the Configure Directory Partitions section.
- In some cases you will need to refresh, if not all partitions are visible. You will have to enter the AD sync account credentials.

- Now you can select the specific partition (your fully qualified domain names in Distinguished Name format) you want to synchronize or unselect the ones you don't want to synchronize.
In the example screenshot above, we are seeing several partitions. For our purposes I've created the lab03.com domain with child.lab03.com domain. Currently both domains are selected and will be synchronized to Azure AD. If you have multiple AD's connected in AADSync, you will need to perform this with every AD connector for each specific Active Directory forest.
This way you can easily filter out complete specific domains of forests connected in the Sync tool. You can still filter the selected domains further with OU filtering or Attribute filtering.
Organization Unit
Most of the time , the service account has access to your complete Active Directory (AD). But there are, undoubtedly, Organizational Units (OU) that contain objects that don't require a sync, such as the Exchange Security Groups OU. Luckily, you can select specific OUs. A lot of ADs already have an OU structure that separates objects that are eligible for synchronization and those that don't; service/admin accounts or specific security groups, for instance.
How do you filter on OU?
- Start the Synchronization Service Manager (or miisclient in DirSync).
- Go to the Connectors tab and select the Connector for the AD you want to filter.
- Right click and select Properties.
- Go to the Configure Directory Partitions section.
- On the section below there is an button called Containers…:

- Press the Containers… button and a selection screen appears:

- Now you can select the OUs that need to be synchronized or unselect those that don't. Do note that you can have Sub OUs, that are automatically selected if you select the parent OU. In the example the root OU AADSync is selected and the Asgard Sub OU under root OU DirSync.
- Depending on your OU design and sync requirements, the selection proces can be very tedious. I haven't found a nice way to make bulk changes (yet?). However:
- The Advanced button on the left bottom side, is a representation in text with the container in Distinguished Name (DN) format:

- The Advanced Container selection could speed things up if you have a list with OUs in DN format.
- When you are ready with selecting OUs, be sure to click all OK buttons to save the filter configuration.
If you still require further filtering of objects because OUs contain objects not to be synchronized, you will have to add Attribute filtering.
Attributes
Even with Domain filtering and OU filtering it is possible that some not to be synced objects are in a OU you need to synchronize; template users, for instance. Or it is impractical to change the OU design just for the purpose of syncing to Azure AD.
In those cases you might want to use Attribute filtering. Each object in Active Directory (AD) has attributes. Some are filled with values and some aren't, depending on the situation. For instance, a mailbox enabled user account has attributes with values (for instance, database, delegates etc.) that non-mailbox enabled user accounts don't.
You can filter on Attributes with the Synchronization Rules Editor, another tool installed with AADSync (and I will limit myself to AADSync). 
As seen at the starting screen (see example above), you can edit existing rules or add a new rule. For documentation purposes it's nice to know you can export a newly created or an edited rule (no importing from the tool though). And obviously you can also delete rules.
The Microsoft AADSync article about Attribute filtering is a good introduction, so I will use their first example for my screenshots:
-

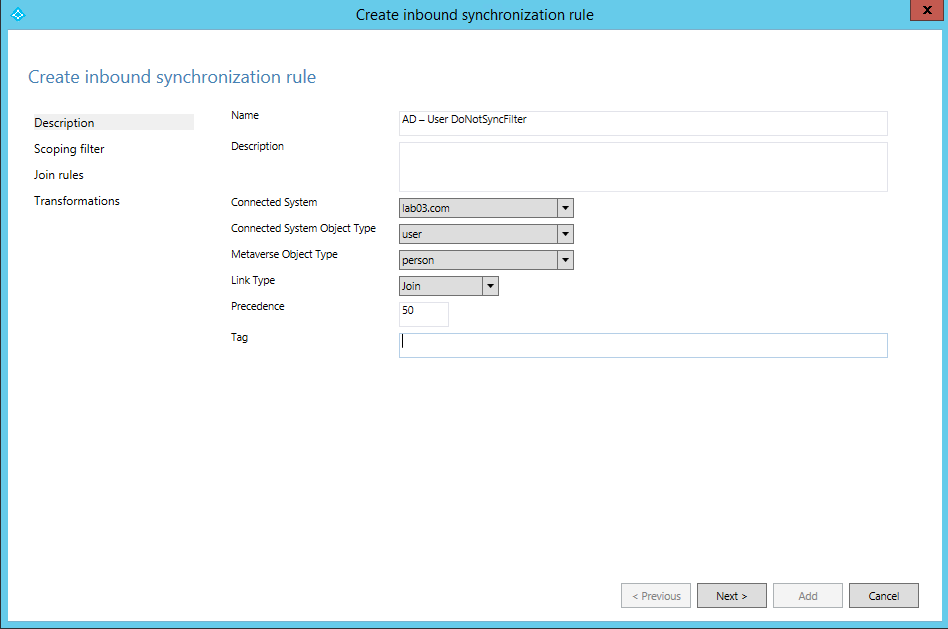
- 1. Make sure Inbound is selected and click Add New Rule. Give the rule a descriptive name, such as In from AD – User DoNotSyncFilter, select the correct forest, User as the CS object type, and Person as the MV object type. In Link Type select Join and in precedence type a value currently not used by another Synchronization Rule, e.g. 50. Click Next.
-

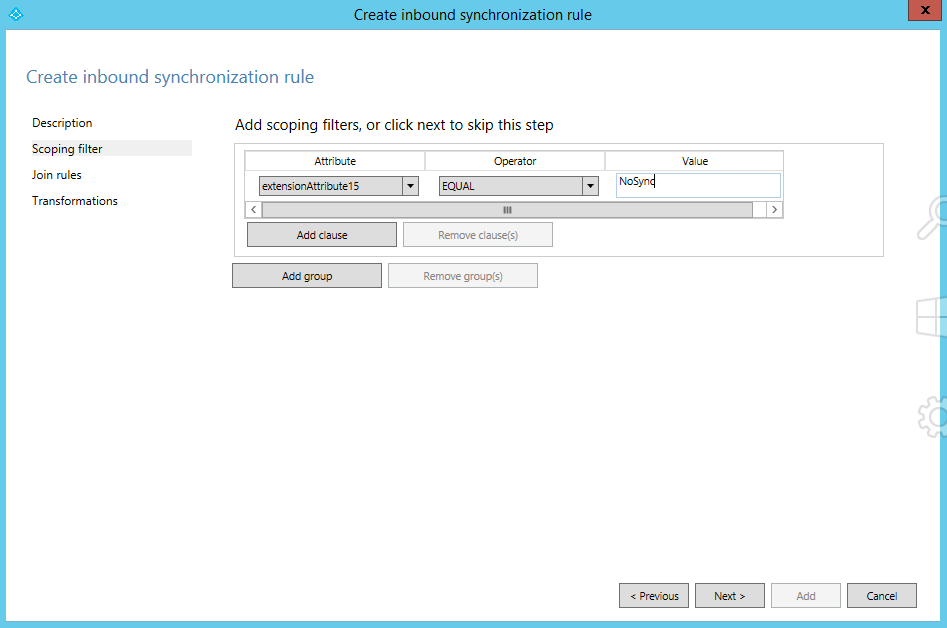
- 2. In Scoping filter click Add Group, click Add Clause and in attribute select ExtensionAttribute15. Make sure the Operator is set to EQUAL and type in the value NoSync in the Value box. Click Next.
-

- 3. Leave the Join rules empty and click Next.

-

- 4. Click Add Transformation, select the FlowType to Constant, select the Target Attribute cloudFiltered and in the Source text box, type in True. Click Add to save the rule.

Unfortunately the documentation isn't that extensive regarding all specific settings, so I'll do my best to explain most of them, at least to get a general feel how these rules work.
In step 1 we determine the Name of the rule, the source (Connected System) such as the Active Directory forest. The Connected System Object Type is the type of AD object. Most common are user, contact and group. However, other specific types are possible (inetOrgPerson, for instance). However, I can't think of a case that other types will be required in combination with AAD. The Link Type is the action performed by the rule; Join, StickyJoin or Provisioned are possible. With Join, objects will be merged or updated, with Provisioned the object will be created. Do note that this option will be superseded by any Join rule configured in a later step (3). Finally the precedence of the rule is specified, which regulates the order in which the rules are applied on the whole system.
In step 2 the scope of the selection is further specified, in this example when extensionAttribute15 equals the value NoSync, that object is handled by this rule. This is the core of Attribute filtering.
Step 3 is used to define Join rules for situations that require to join two or more objects in the Metaverse. This requires two attribute values from the source and target object to be equal.
And finally in Step 4 we determine or change the value of an attribute. The flow type is either Constant, Direct or an Expression. The first sets an attribute to a specified value (filled in Source), Direct takes the attribute value from the source object and Expression is the most flexible way to define a value, using Visual Basic for Applications (VBA). In this case the attribute cloudFiltered is set to True, which means another (Outbound) rule will filter this object. A Function Reference list with an explanation can be found here, while a Provisioning Expressions explanation can be found here.
Another examples of AADSync filtering with Synchronization Rules can found here and here.
The most important selection however, is the rule type: Inbound or Outbound. Domain and Organization Unit filtering is always inbound, however Attribute filtering is possible both inbound and outbound. I will continue that subject in the upcoming fourth post in this series.
Concluding
Filtering allows you to limit the amount of objects synced to Azure AD. There are three supported ways to filter your AD objects; based on domain, Organization Unit or Attributes. Each method is more granular filter, but also more complex.
My preference is to begin with Domain/OU filtering and if that is not enough and you are unable to change your on-premises AD to fit you synchronization needs, then I would consider Attribute filtering. Do note that this post focuses on Inbound filtering, in the next post I will discuss Outbound filtering, which is only possible with Attribute Filtering.
22:20
thanks
10:24
It helped 🙂
13:42
Hi Dave,
I’m trying to implement filtering for inactive users, and probably missing something. I’ve added a rule setting cloudFiltered attribute based on expression IIF([lastLogonTimeStamp]<NumFromDate(DateAdd("d",-90,Now())),"True",NULL).
I've added lastLogonTimestamp in AD connector (this should've added it to source schema). Running full import from AD I get the attribute in connector space object properties with add action and proper value (also in simulation it's present in source object details).
And now I'm stuck – can't get the rule to impact users